
In this blog, we will be sharing the capabilities of the NeuLog Sensors and Modules, and how their data collection software/application can benefit both teachers and students. We will also suggest some tricks and tips we have learned in our experience.
For any questions or comments write to us at info@neulog.com.
More to read – NeuBlog
- Projects using NeuLog sensors and AI
- Basic Sound Set and Sound experiments
- Basic Motion Set and Motion experiments
- Basic pH Set and pH experiments
- Published Research with NeuLog GSR sensor
- Basic GSR Set and GSR experiments
- Basic Heat Set and Heat experiments
- Neuron Logger Sensors
- Coding For Young Students – The Next Big thing
- Most Beautiful Graphs in Physics
- Light sensor brought to light
Projects using NeuLog sensors and AI
04/09/2025
One of NeuLog’s most notable advantages is the ability to perform an experiment with multiple sensors synchronized to each other, even connected wirelessly by Bluetooth to any computer platform.
Another unique advantage of NeuLog, is the ability to use multiple sensors of the same type in an experiment. NeuLog enables the use of up to nine sensors of the same type in an experiment.
A simple way to work with AI is to run a research experiment with NeuLog sensors, save the data in an Excel file, and then ask ChatGPT to analyze the results.
Here is an example of a dialog with ChatGPT about photosynthesis.
You said:
I have small greenhouse with temperature, oxygen and CO2 sensors.
I have measurements of these sensors for 7 days.
What analysis I can get from you?
ChatGPT said:
Great — with 7 days of data from temperature, oxygen, and CO₂ sensors in your greenhouse, there are several useful analyses we can perform to help you understand your system and optimize plant growth. Here’s a breakdown of what I can offer:
- Data Cleaning and Summary Statistics
Detect missing or abnormal values
Daily averages, minimums, and maximums
Summary trends: Are temperature or CO₂ levels consistent? Is oxygen dropping at night?
- Time Series Analysis
Plot trends over time (hourly/daily patterns)
Detect diurnal cycles (e.g., does CO₂ rise at night when photosynthesis stops?)
Identify anomalies or events (e.g., heat spikes, ventilation failures)
- Correlation and Interaction Analysis
How does temperature affect CO₂ or oxygen?
Check correlations:
Does higher temperature reduce CO₂ faster?
Is oxygen increasing during daylight (photosynthesis)?
Visualize relationships using scatter plots or correlation matrices.
- Photosynthesis Insights
If your plants are active photo synthesizers (e.g., tomatoes, lettuce), we can:
Estimate photosynthetic activity from O₂ and CO₂ patterns
Compare day vs. night gas exchange
Suggest optimal CO₂ ranges and timing for injection (if you control it)
- Machine Learning or Predictive Modeling (Optional)
With just 7 days, ML models are limited, but we could:
Build simple models to predict CO₂ or O₂ based on temperature
Cluster periods into “high activity” vs. “low activity” days
Start training a model to recommend optimal conditions
- Optimization Suggestions
Based on the analysis, I can:
Suggest temperature or CO₂ levels that correlate with higher O₂ (photosynthesis proxy)
Recommend ventilation, CO₂ injection, or shading schedules
What I need from you:
Please upload the sensor data — preferably in CSV or Excel format, with timestamps and columns like:
timestamp, temperature, CO2_ppm, oxygen percent
Once I have the file, I can:
Run the full analysis
Generate graphs
Give you actionable insights
Here’s a quick checklist to help you format it properly:
Recommended File Format: CSV or Excel
Example file name: greenhouse_data.csv or greenhouse_readings.xlsx
Column Structure
Make sure your file has a header row, like this:
timestamp temperature CO2_ppm oxygen percent
2025-07-10 08:00:00 26.5 480 20.5
2025-07-10 09:00:00 27.0 450 20.6
... ... ... ...
timestamp should include both date and time (hourly preferred)
Units:
Temperature in °C
CO₂ in ppm (parts per million)
Oxygen in % (e.g., 20.9 for normal air)
Optional columns (if available):
If you have other sensors or notes (e.g., light intensity, humidity, fan on/off, etc.), include them as extra columns.
Once the file is ready:
Upload it here.
I’ll immediately start the analysis and show you insights with visuals.
Let me know if you need help cleaning or formatting the file too — I can guide you step-by-step in Excel or any tool you're using.
Photosynthesis research steps
- Install NeuLog's CO2, oxygen, and temperature sensors connected to the Bluetooth module in one chamber of the Ecolog kit and a pot with a plant
- Ensure the possibility of watering the plant
- Ensure electricity for the Bluetooth module
- Run the experiment for at least a week (preferably longer)
- Export the data to an Excel file
- Contact ChatGPT and ask them to analyze the data as described above.
More research examples
The following experiments were done by high school students, but without ChatGPT help.
Better sail design
- Prepare a model of a boat with a sail.
- A powerful fan is installed in back of the board.
- The boat is connected to two force sensors to measure the force vectors acting on the boat: the force along the boat (which represents its speed of progress) and the force on the side of the boat (which represents the degree of friction of the boat in the water).
- The boat sail is connected to an angle sensor that shows the angle of the sail relative to the boat body (zero angle indicates that the sail is parallel to the boat body)
- Another angle sensor shows the direction of the boat relative to the fan.
- Run an experiment that samples and saves the forces and angles.
- Change the boat and the sail angles to the wind direction.
- Save the results of the experiments in Excel sheets
- After completing the test, replace the sail with another sail and repeat the process.
- Transfer the data to GPT, which will find which sail has the best quality.
Acoustics test
- Distribute five sound sensors in a room
- Make a loud sound or play a loud music near one of the sensors
- Export the data to an Excel file
- Send the data to GPT and ask it to analyze the acoustics in the room and to recommend improvements.
You can ask ChatGPT for additional ideas for research experiments to be carried out with certain sensors.
In the next post we shall share such dialogs with ChatGPT.
The NeuLog system enables the creation of Machine Learning Systems, and we shall describe that later using the NeuLog API software.
Sound experiments
04/08/2025
Our goal is to ensure that students do not experience failure. We aim to support teachers by providing lesson plans that keep students attentive and help them understand and retain complex material. This includes detailing the procedure step by step, demonstrating expected results, and guiding students through their analysis.
In sound experiments, mathematics plays a crucial role in analyzing measurements and graphs, helping students gain a deeper understanding of sound principles. As we always emphasize—mathematics is the language of science.
The sound experiments require the following set:
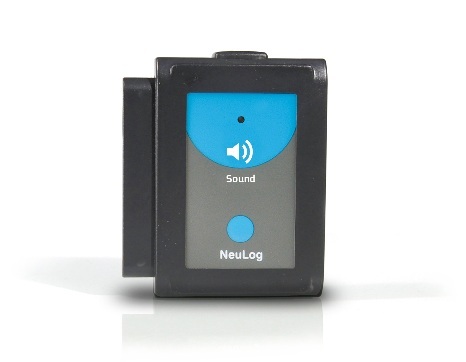
BLT-202 USB/Bluetooth communication module
NUL-212 Sound logger sensor
The sound lesson plans can be found in Physics experiment page in this site.
The sound videos can be found in Experiment videos page in this site.
The lesson plan Exploring sound covers how to measure different intensities of sound, what is the meaning of sound units (dB) and why it is used, different levels of sound intensities and the concept of sound isolation.
Speed of sound video
This video shows how to measure the time delay between the two sound sensors and calculating the speed of the sound in air.
The lesson plan Speed of sound, describes how to measure the speed of sound. In this experiment we use two sound sensors in distance between them, clapping hands near one of them and measuring the time delay in the graph.
The speed of sound is calculated by dividing the distance between the two sensors by the time delay.
Sound waves video
This video shows the sound waves, how to measure its frequency and how a musical instrument sound looks like.
The lesson plan Sound beats, demonstrates the interference of two sound waves and analyzing the resulting wave mathematically.
Sound Intensity
Sound is a travelling wave that propagates as an oscillation of pressure through solids, liquids, or gases. It consists of frequencies within the range of human hearing and of and at levels strong enough to be perceived.
Sound intensity is defined as the power per unit area. The basic units are watts/m2 or watts/cm2
Sound intensity measurements are made relative to the standard threshold of human hearing intensity at 1000Hz, I0.
The sound levels we hear vary dramatically. For instance:
Whispering is 1000 times louder than the hearing threshold.
Speech in a restaurant is 10 million times louder than the hearing threshold.
A rock concert is 10 billion times louder than the hearing threshold.
The amazing thing is that the human ear is able to distinguish speech at all different levels of intensity and on a logarithmic scale.
Sound intensity is commonly measured in decibels (dB). It is a logarithmic scale, meaning an increase of 10 dB represents a tenfold increase in intensity.
Decibels measure the ratio of a given intensity I to the threshold of hearing intensity, I0.
When I = I0 the sound level is 0dB.
In a quiet room (what is called silence), the sound intensity is 10,000 times the threshold and produces 40dB (10log10[10,000] = 40).
Speed of sound
The speed of sound is the velocity at which sound waves propagate through a medium. Sound waves are mechanical longitudinal waves generated by pressure variations in a medium, which the human ear perceives as sound.
The speed of sound experiment utilizes two sound sensors to measure the propagation of sound through air. By placing the sensors in a known distance apart and generating a sharp sound (such as a hand clap), we can determine the time difference between the signals received by each sensor.
Sound waves
Key properties of sound waves are:
Frequency (f): The number of complete cycles per second, measured in Hertz (Hz).
Period (T): The time taken for one full cycle, measured in seconds.
In this activity, we will use a sound logger sensor to measure the period and frequency of sound waves produced by three tuning forks with different lengths.
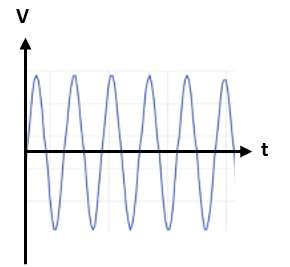
A sound signal is sine signal according to the following formula:
A(t) = Asin(2πft)
A represents the amplitude (maximum value) of the signal
f represents the frequency
The following graph describes a sine wave in the time domain:
Another way to describe waves is in the frequency domain:
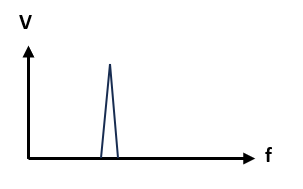
This graph shows the frequency and amplitude of the wave. If the wave is composed of several sine waves, this graph displays them.
Converting a signal to frequency domain is called Fourier Transform. We use this NeuLog function especially to see the side tones of a musical instrument sound.
Sound Beats and Wave Interference
Wave interference is a phenomenon which occurs when two waves meet while traveling along the same medium. When two waves interfere, the resulting displacement of the medium at any location is the algebraic sum of the displacements of the individual waves at that same location.
When two sound waves of nearly identical frequencies interact, they create a phenomenon called beats. Beats occur due to superposition, where two waves combine to form a new wave pattern.
Constructive interference occurs when waves reinforce each other, increasing amplitude.
Destructive interference occurs when waves cancel each other out, reducing amplitude.
This experiment explores how two tuning forks with slightly different frequencies produce beats. The frequency difference between the two forks determines the beat frequency.
The following signal is the outcome of these two signals.
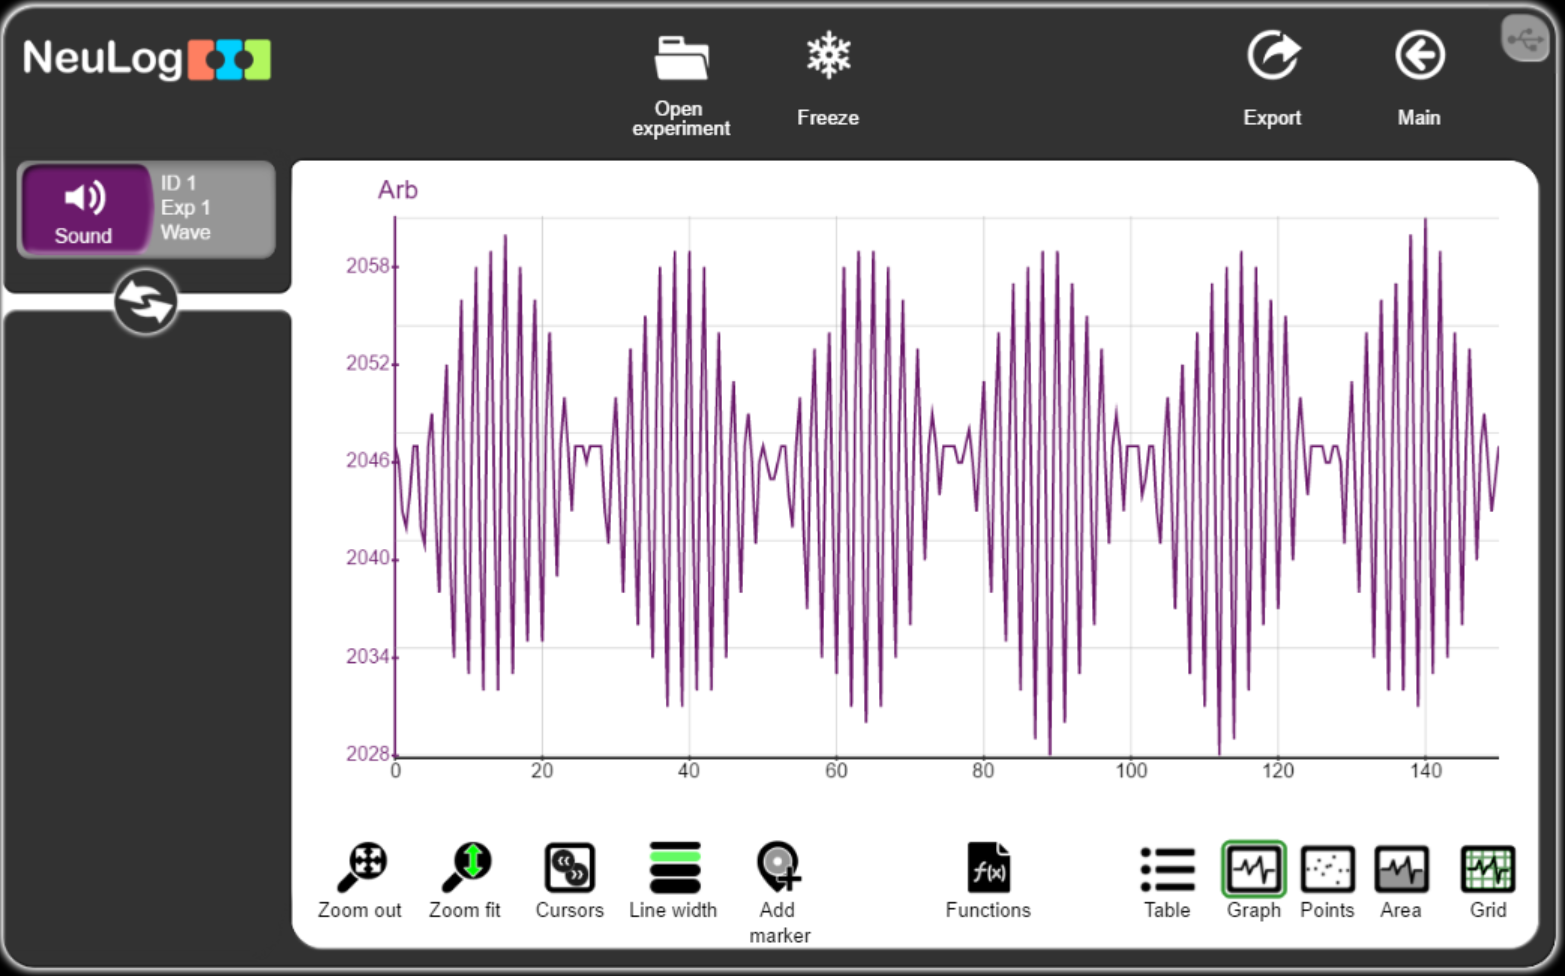
The Fourier Transform of this beat signal is:
![]()
The beat signal is a sum of two waves:
Asin(2πf1t) + Asin(2πf2t)
We use the trigonometric formula to show that that this sum of two sine waves is equal to a product of two waves:
2Acos(2π(f1 - f2)/2)t)sin(2π(f1 + f2)/2)t)
This is what we call a modulated signal.
The signal frequency is (f1 + f2)/2.
The amplitude is changed according to the frequency (f1 – f2)/2.
Motion experiments
23/07/2025
The following set enables to perform motion experiments which incorporate mathematical concepts, allowing for different levels of engagement.
Teachers can choose to focus on a qualitative approach, explaining the observed phenomena, or delve deeper into the mathematics to explore the equations and relationships in greater detail. The idea is to feel that mathematics is the language of science.
BLT-202 USB/Bluetooth communication module
NUL-213 Motion logger sensor
The lesson plan Motion parameters of a moving cart, explores displacement, velocity, acceleration – and understanding their interrelationships.
The lesson plan Newton second Law and the following video, Investigates the relationship between force, mass and acceleration, and analyzes motion through mathematical equations.
Newton Second Law experiment video
The lesson plan Cart motion on inclined plane, covers the four kinematics equations of motion, studying the behavior of a cart on an incline, and understanding motion with constant acceleration.
All the above lesson plans can be found in Physics experiment page.
The experiment video above can be found in Experiment videos page.
Motion parameters
The three main motion parameters are:
- Distance (S): Represents how far an object moves from its starting point.
- Velocity (V): The rate of change in distance over time, calculated as:
- Acceleration (a): The rate of change in velocity over time, calculated as:
The formula above describes average acceleration (or constant acceleration).
To calculate the object's momentary acceleration (a(t)), we use the ratio of a very small section of velocity change to the corresponding time difference.
In Motion parameters of a moving cart experiment, a cart is accelerated forth and back on a track, and we observe and analyze how its distance, velocity and acceleration change over time. The following formulas describe velocity and distance of the accelerated cart as functions of time:
Velocity:
V = at + V0
Distance:
S = at2 /2+V0t + S0
Where:
- V0 = Initial velocity of the cart.
- S0 = Initial distance from the reference point.
- a = Acceleration of the cart.
- t = Time elapsed
Newton second Law
Newton second Law experiment deals with Newton's second law of motion that defines the precise relationship between force, mass and acceleration. The law states that the acceleration of an object is directly proportional to the net force applied and inversely proportional to its mass:
F = m ∙ a
Understanding this relationship is crucial in physics and engineering, as it explains the fundamental mechanics behind motion and force interactions.
The cart is pulled by a weight and accelerates on a track half of the way and then, decelerates because of the friction.
The following graph illustrates the velocity of a cart moving along a track.
The following picture illustrates the forces acting on the cart.
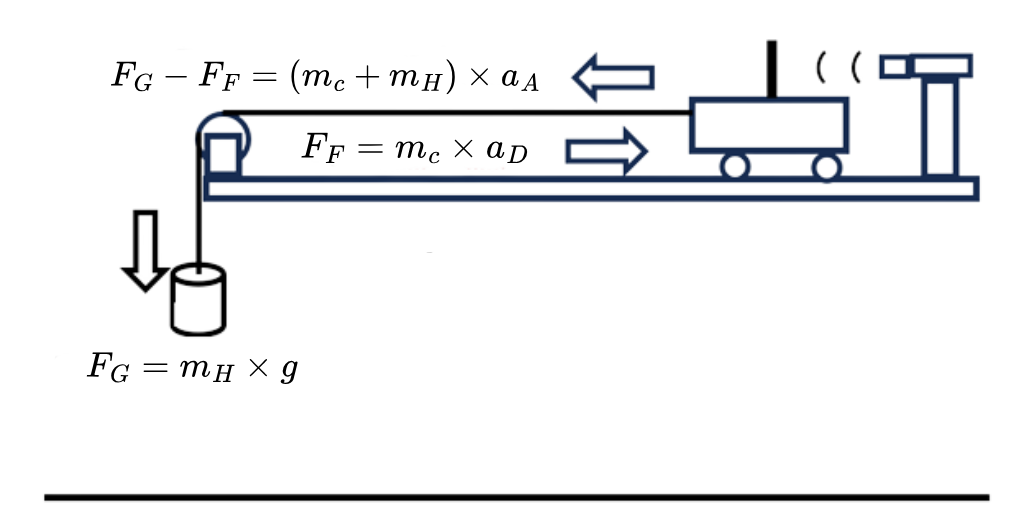
In this experiment we learn how to extract the acceleration and the deceleration coefficients from the motion graph.
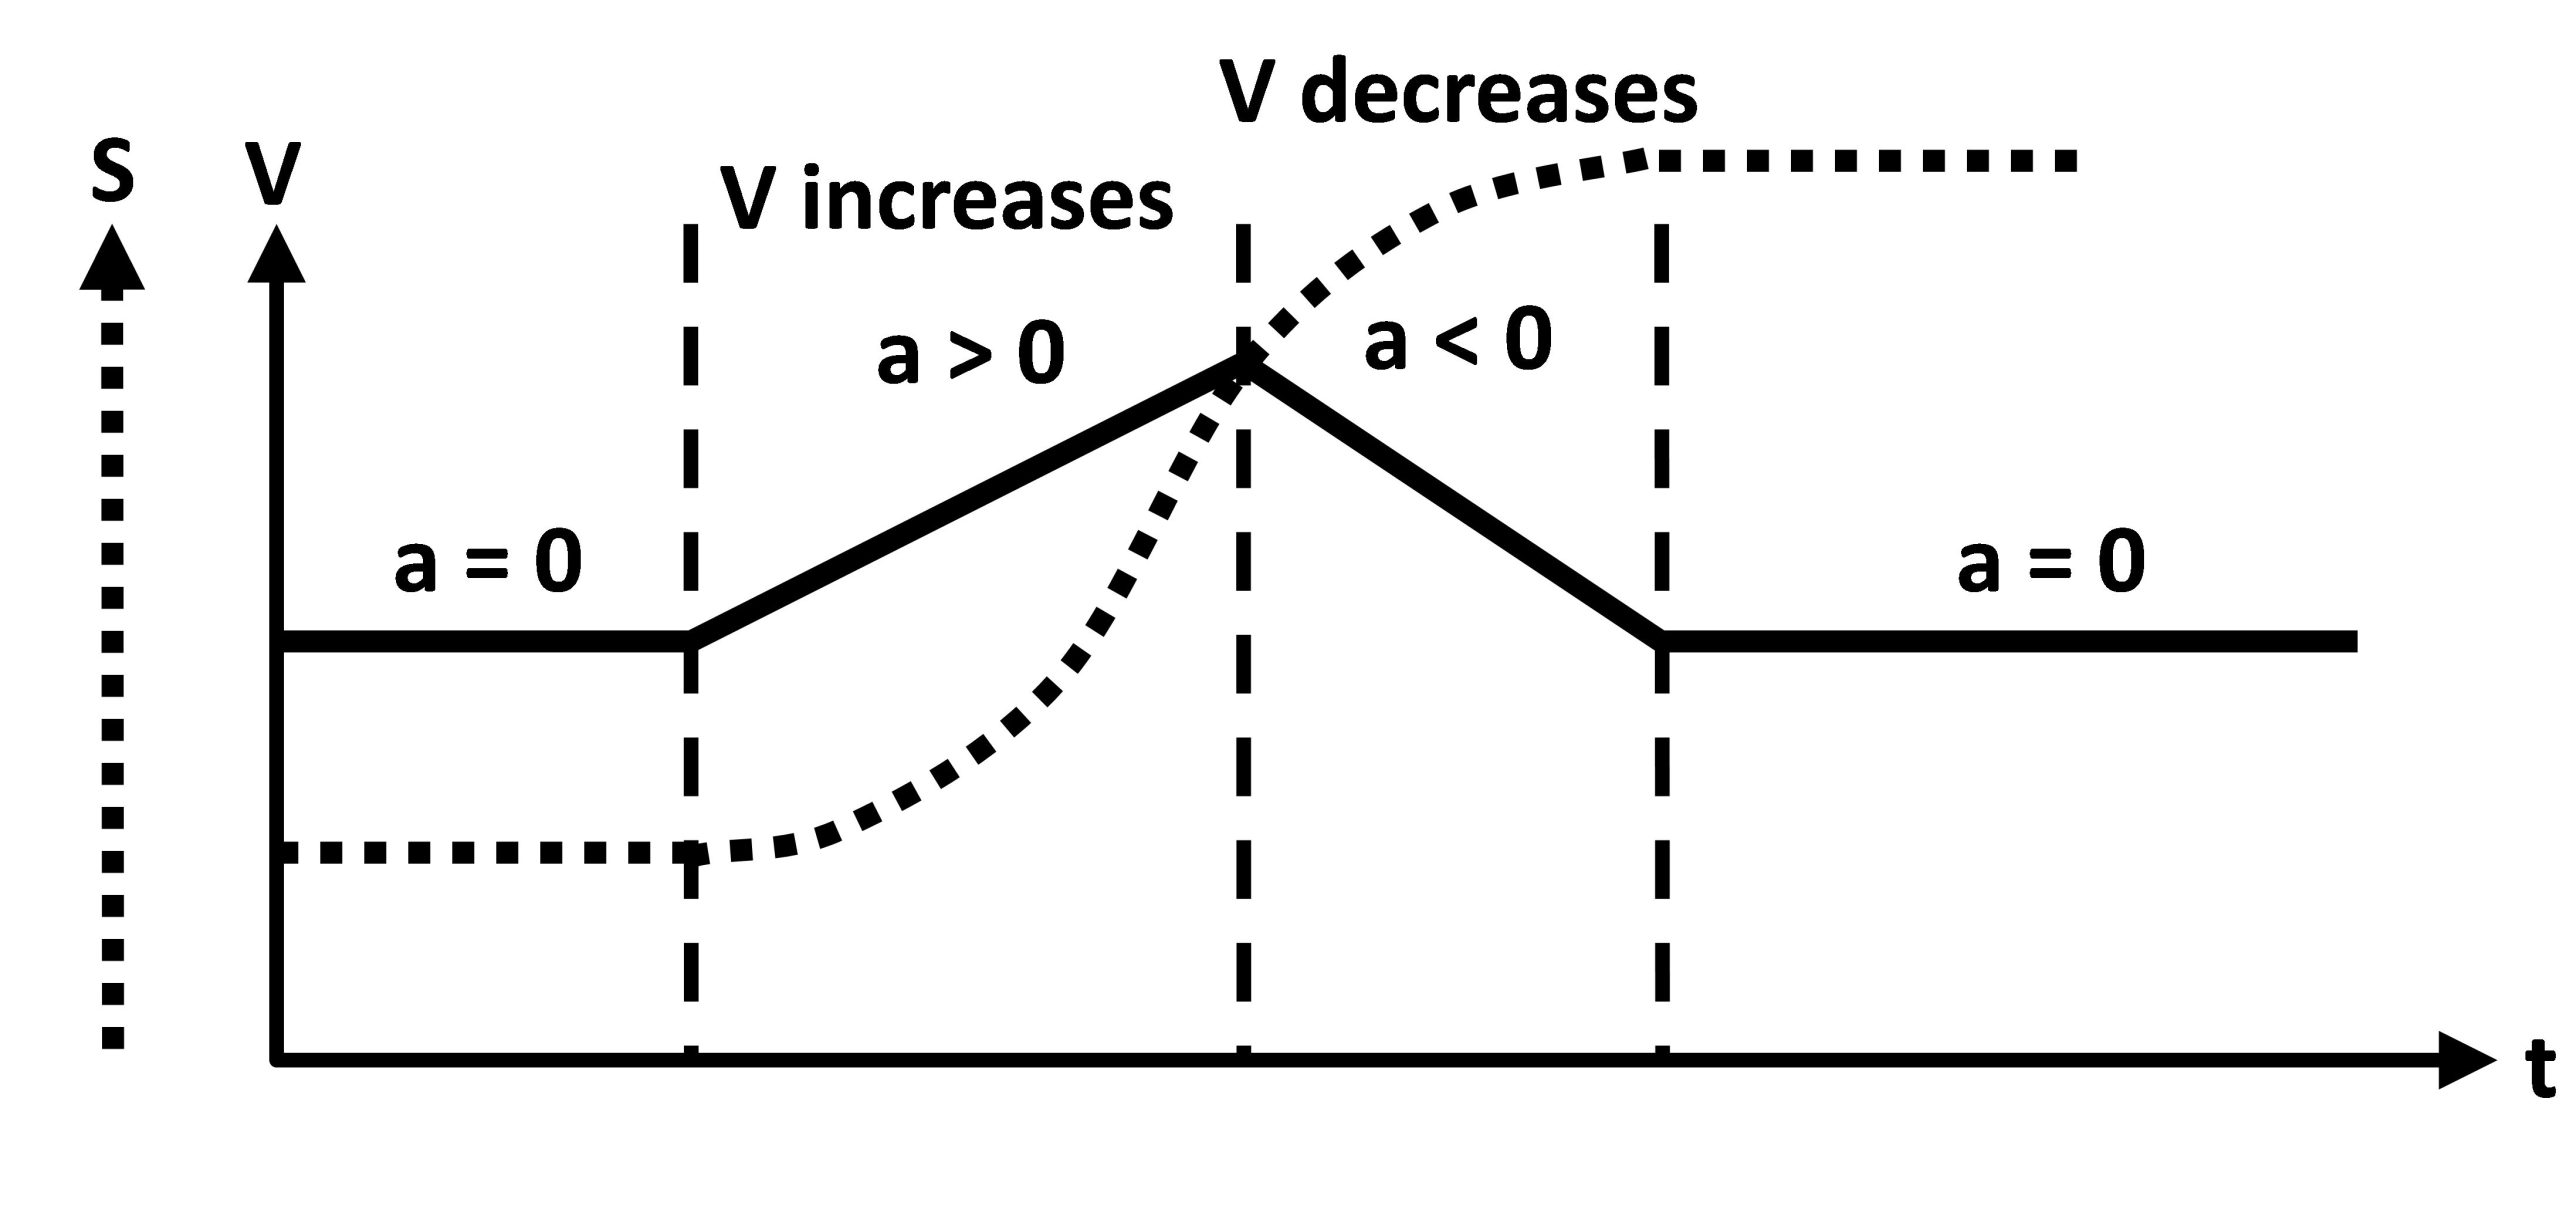
Motion is described using four fundamental parameters: displacement, velocity, acceleration and time. The kinematic equations allow us to predict unknown motion parameters if others are given. These equations apply only when acceleration remains constant, a condition known as linear motion.
Kinematic Equations
In linear motion, velocity increases or decreases according to the following equation:
- Vt = V0 + a ∙ t
Where:
- Vt = velocity at time t Vtime
- V0 = initial velocity
- a = acceleration
- t = time
Displacement S is given by the integral of velocity over time, and in
linear motion, it follows the equation:
S=∫Vt dt
- S = V0 ∙ t + 1/2 ∙ a ∙ t2
Velocity is also defined as the derivative of displacement:
V= dS/dt
By substituting equation (1) into equation (2) and simplifying, we obtain the third kinematic equation:
- Vt2 = V02 + 2 ∙ a ∙ S
- "S = V0 + Vt / 2 ∙ t
In Cart motion on inclined plane experiment, we measure the motion of a cart on an inclined plane using a motion sensor and examine how the experimental results fit these equations.
This hands-on experiment allows students to apply these formulas to real-world data, helping them understand how motion parameters interrelate and how they can be visually represented through graphs. For teachers, this provides an opportunity to guide students in connecting theoretical physics principles with practical observations.
pH experiments
15/07/2025
The pH set enables relating to the chemistry world – Acids and Bases, Acid rain, Action of a buffer solution and more.
BLT-202 USB/Bluetooth communication module
NUL-206 pH logger sensor
The lesson plan Common Acids and Bases experiment, presents us with the pH scale and how to determine the pH values of household substances.
The lesson plan Acid rain experiment, describes the acid rain phenomenon by producing carbon dioxide and dissolving it in water.
The lesson plan Action of a Buffer Solution experiment, describes buffer solutions which are used as a means of keeping pH at a nearly constant value in a wide variety of chemical applications. Many life forms thrive only in a relatively narrow pH range. An example of a buffer solution is blood.
The pH lesson plans can be found in Chemistry experiments page in this site.
Acids and Bases
Acids and bases are chemical opposites that neutralize each other. Acids are substances that increase the concentration of hydrogen ions (H+) in solution, while bases increase the concentration of hydroxide ions (OH-).
Acids are substances that donate protons (H+) or increase the concentration of hydrogen ions (H+) in water.
Examples of acids are: hydrochloric acid (HCl), sulfuric acid (H2SO4), citric acid in fruits (C₆H₈O₇), and acetic acid in vinegar ( C2H4O2).
Bases are substances that accept protons (H+) or increase the concentration of hydroxide ions (OH-) in water.
Examples of bases are: sodium hydroxide (NaOH), potassium hydroxide (KOH), ammonia (NH3), and many metal oxides.
When acids and bases react, they neutralize each other, forming a salt and water.
Indicators are substances that change color depending on the pH of the solution, helping to identify acids and bases.
The pH scale is logarithmic and it shows the hydrogen ion [H+] concentration in a solution, so acidity can be expressed using this scale that goes from 0 to 14. Neutral solutions have a pH 7, acidic solutions pH is less than 7 and basic solutions pH is more than 7.
Many common household solutions contain acids and bases which play an essential role in our everyday lives.
In Common Acids and Bases experiment you will study the acidity and basicity of daily common solutions using a pH sensor. You will determine the pH values of household substances such as lemon juice, vinegar, soda, black coffee, tap water, milk, soapy solution, baking soda.
Acid rain
Acid rain is a phenomenon associated with the development of urban and industrial areas. It is created by the incorporation of chemical compounds such as carbon dioxide, sulfur dioxide and nitrogen oxides to rain water. These compounds are emitted by car's exhausts, factories and thermoelectric centrals.
When these oxides are in contact with humidity in the atmosphere, they are transformed into secondary polluting agents which form solutions of Carbon, Sulfuric and Nitric acid. Rain carries these compounds to the Earth’s surface, deposits them on the soil and in water bodies.
The persistent fall of acid rain damages lakes, rivers and underground waters, causing the death of fish and other organisms in aqueous ecosystems. It acidifies and demineralizes soils, damages forests, national parks and reserves and causes low producing crops. Also, the acidity of the water deteriorates archeological zones, historical monuments, buildings and metallic structures. The dimension of the damage depends on the degree of acidity.
In Acid rain experiment, we produce CO2, one of the gases responsible for acid rain by using vinegar and baking soda. Baking soda is sodium bicarbonate (NaHCO3) and the key ingredient of vinegar is acetic acid (CH3COOH).
CH3COOH(aq) + NaHCO3(s) ð CO2(g) + H2O(l) + CH3COONa(aq)
Carbon dioxide (CO2) reacts reversibly with water (H2O) and produces carbonic acid (H2CO3), a weak acid which dissociated into hydronium (H3O+) and bicarbonate (HCO3-) ions. This reaction occurs when acid rain forms:
2H2O(l) + CO2(g) ó H2CO3(aq) + H2O(l) ó H3O+(aq) + HCO3–
You will quantify the variation in the pH induced in the water after the carbon dioxide is dissolved in it.
In chemical equations, (s), (l), (g), and (aq) denote the physical state of a substance: (s) for solid, (l) for liquid, (g) for gas, and (aq) for aqueous (dissolved in water). These symbols are placed in parentheses after the chemical formula of a substance to indicate its state.
In chemistry, a buffer is a system, usually an aqueous (water) solution, which resists having its pH changed when an acid or a base is added to it.
Buffer Solutions
Buffer solutions are used as means of keeping pH at a nearly constant value in a wide variety of chemical applications. Many life forms thrive only in a relatively small pH range. An example of a buffer solution is blood.
There are two common kinds of buffer solutions: those that contain a weak acid plus one of its salts (e.g., acetic acid plus sodium acetate) and solutions that contain a weak base plus one of its salts (e.g., ammonia plus ammonium chloride).
There is equilibrium in a solution between a weak acid, HA, and its conjugate base, A- :
HA + H2O H3O+ + A−
- When hydrogen ions (H+) are added to the solution, the equilibrium moves to the left, as there are hydrogen ions (H+ or H3O+) on the right-hand side of the equilibrium expression.
- When hydroxide ions (OH-) are added to the solution, the equilibrium moves to the right, as hydrogen ions are removed in the reaction (H+ + OH- → H2O).
Thus, in both cases, some of the added reagent is consumed in shifting the equilibrium in accordance with Le Chatelier's principle and the pH changes by less than it would if the solution was not buffered.
Through Action of a Buffer Solution activity, we shall discover the main characteristics of such mixtures. The first part of the experiment will allow us to study how water reacts to the addition of an acid or a base.
In the second part, the experiment will be repeated using this time an aqueous solution with a buffer (Alka Seltzer).
Alka-Seltzer is a combination of citric acid (weak acid) and sodium bicarbonate (salt) used for the relief of heartburn, acid indigestion, and stomach aches.
Published Research with NeuLog NUL-217 GSR Logger Sensor
10/07/2025
1. Validity Testing the NeuLog Galvanic Skin Response Device
In 2020 at the IEEE International Conference on Systems, Man, and Cybernetics (SMC), Toronto Validity Testing the NeuLog Galvanic Skin Response Device published by Theresa Flagler; Jonathan Tong; Robert S. Allison; Laurie M. Wilcox at York University Toronto, Canada.
Abstract of Testing the NeuLog Galvanic Skin Response Device:
This paper describes validity testing of the NeuLog NUL-217 GSR measurement device. This was accomplished by comparing the NeuLog device to readings from the Biopac Student Lab Systems EDA system. The results of this research found that measurements from the NeuLog device are correlated with and comparable to the Biopac system. The absolute skin conductance levels typically differed between the two systems. For most psychological and human factors research the dynamic skin conductance responses are more important than absolute levels. The timing and relative magnitude of changes typically tracked well across the two systems indicating that the Neulog system is suitable for the purposes of its intended use in psychological and technological research.
2. Levitation Experience
An article in Virtual Reality Journal., April 2025, Levitation Experience authored by Mounia Ziat; Rishi Jhunjhunwala; Adwait Gharat; Yo Deshpande; Roope Raisamo at Bentley University, IDCC, Waltham, USA. https://doi.org/10.1007/s10055-025-01138-9
Abstract of Levitation Experience in Virtual Reality:
We investigated the effects of combining VR-guided meditation with out-of-body experiences, such as levitation, on embodiment and mindfulness practices. Participants engaged in a self-view (video feedback) meditation session followed by a levitation phase in a VR environment. We observed a significant increase in participants’ EDA responses during the levitation phase. The results were influenced by several factors, including the duration of the meditation, the length of the levitation phase, and participants’ subjective experiences. Participants who reported higher scores on the physical levita¬tion scale exhibited an open and curious attitude, accepting the experience without becoming overly absorbed. In contrast, individuals with the capacity to observe and distance themselves from their feelings, emotions, and experiences were less inclined to report a virtual levitation experience.
GSR experiments
30/06/2025
The Galvanic Skin Response (GSR) sensor is an amazing sensor that enables us to measure human body response to stimulations like touch, smell, sight, sound or emotion conditions like stress, excitement, fear etc.
A short video describing how the GSR is connected and works.
The GSR sensor set includes the following:
- BLT-202 USB/Bluetooth communication module
- NUL-217 GSR logger sensor
With the GSR set and Emotional stress measurement experiment you can:
- Understand the fight or flight response.
- Examine how stimulation of the human system (by touch, smell, sight or sound) causes the sweat glands in the hand to secrete sweat.
- Understand the principles of a polygraph (lie detector).
- Explore the concept of biofeedback.
- Understand Progressive Muscle Relaxation (PMR) and Virtual Reality Exposure Therapy (VRET) using GSR.
With the GSR set and Sense of touch experiment you can:
- To understand that the skin is the largest sensory organ in the body.
- Explore how the skin detects touch, pressure, temperature, and pain.
- Identify which parts of the body are the most sensitive to touch.
- To recognize that fingers, lips, genitals, and toes are among the most sensitive areas of the body.
Emotional and sensory stimulation triggers sweat production.
The GSR (Galvanic Skin Response) logger sensor measures sweat secretion from the sweat glands in the hand. When stimulation occurs, sweat levels increase, leading to higher skin conductivity.
These lesson plans can be found in Biology experiment page in this site.
* These experiments are based on Morris Tischler’s book ‘Concepts of Biotechnology’.
The fight-or-flight response is activated in reaction to an acute threat, preparing the body to either react or retreat.
When a threat is perceived, the sympathetic nervous system (a part of the autonomic nervous system) is activated, releasing the hormones noradrenaline and adrenaline.
These hormones bind to adrenergic receptors on peripheral tissues, causing:
- Pupil dilation
- Increased heart rate
- Elevated blood pressure
- Faster breathing
- Increased sweat production
Sweating helps the body dissipate excess heat generated by increased muscle activity.
GSR measurement is a key component of a Polygraph (lie detector). Lying induces a stress response, which is reflected in physiological changes.
GSR is also a simple yet powerful tool for analyzing physiological responses in biofeedback therapy.
Biofeedback is a technique that increases awareness of physiological functions using electronic monitoring, allowing individuals to learn how to control bodily responses voluntarily.
Progressive Muscle Relaxation (PMR) is a guided exercise where individuals follow instructions to regulate breathing and focus on different muscle groups.
Within 30 to 45 minutes, PMR can induce full-body relaxation, increase blood flow and reduce stress and headaches.
A typical GSR graph during PMR relaxation shows a decrease in skin conductivity, which means reducing stress.
Virtual Reality Exposure Therapy (VRET) presents individuals with computer-generated simulations of their feared environments, allowing them to encounter controlled phobic triggers.
VRET is a well-established treatment for phobias, such as: Claustrophobia, Arachnophobia, Cynophobia, Acrophobia, etc.
A typical GSR graph during VRET shows fluctuations in skin conductivity:
In the HB1 experiment, you will observe how humans react to emotional stimulation. You will measure sweat secretion in response to different stimuli and record the changes over time. You will exercise lie detecting and have a PMR script to practice.
THE SKIN AS a Sensory Organ
The skin is our largest sensory organ in the human body, covering its entire surface. The skin contains a variety of nerve endings that are highly responsive to pressure, pain, and temperature changes (hot or cold).
The skin is sensitive to several types of stimulation:
- Touch
- Pressure
- Cold
- Heat
- Pain
The fingers contain up to 800 nerve endings per square centimeter (1 cm x 1 cm). The following figure illustrates the areas of greatest sensitivity in the hand.
In the Sense of touch experiment, you will check which are the most and least sensitive parts of the body.
GSR Measurement ranges:
The NUL-217 NeuLog GSR logger sensor has two measurement modes: ɥS (micro-Siemens) and Arb (arbitrary units).
- The µS range measures absolute conductivity in microSiemens, which varies between individuals.
- The Arb range amplifies changes in conductivity, making it more useful for detecting relative responses.
When a person’s baseline conductivity is high, small changes may not be easily detected.
Therefore, Arb mode is preferred when tracking changes is more important than measuring absolute values, such as in lie detection experiments.
Heat experiments
16/06/2025
The easiest way to see how simple it is to perform experiments with a logger sensor and how many possibilities it allows is to use the following set:
BLT-202 USB/Bluetooth communication module
NUL-203 Temperature logger sensor
Heat Transfer experiment video
This video provides a detailed overview of the NeuLog software – both online and offline modes – and demonstrates its versatile functions.
Latent Heat experiment video
This video explores temperature graphs of boiling water in a kettle and freezing water in a refrigerator using NeuLog sensors.
The lesson plan Latent heat experiment, can be found in Physics experiment page in this site.
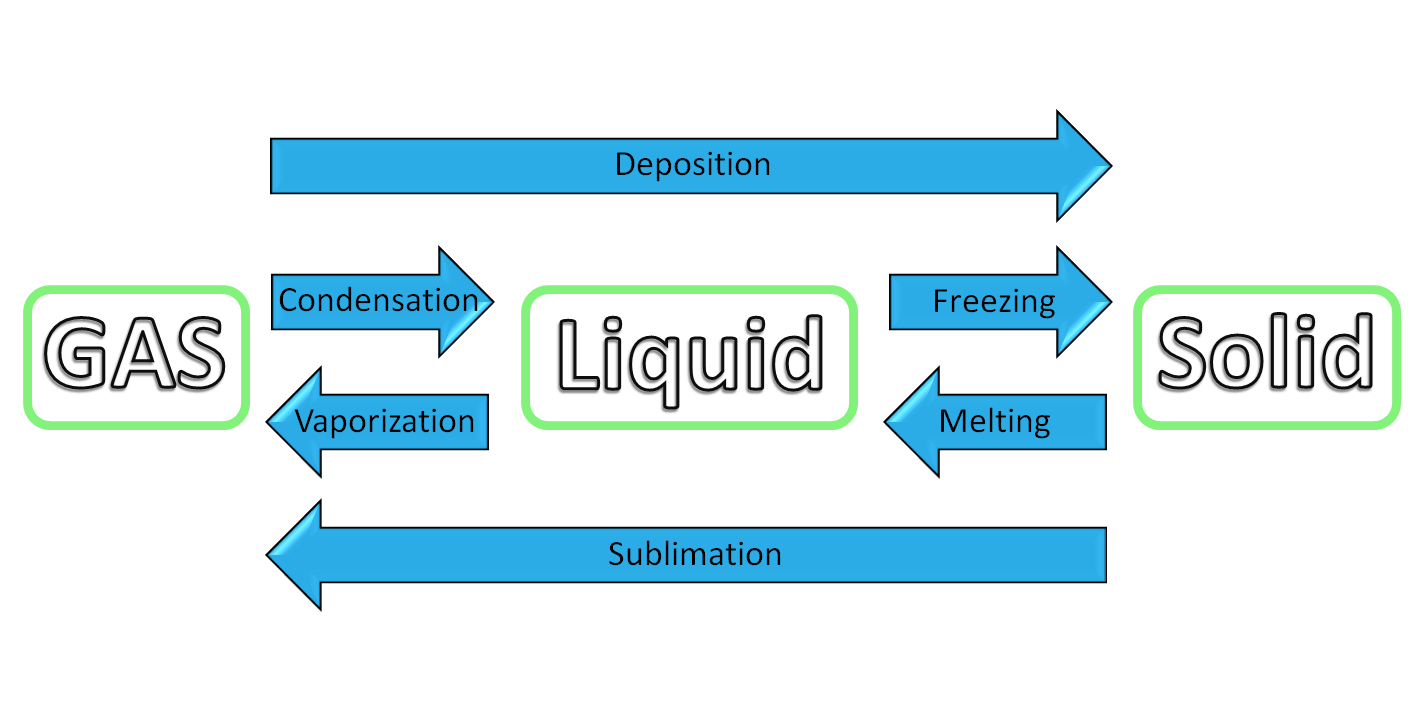
The three classical phases of matter are solid, liquid and gas. Gas particles are well-separated whereas liquid particles are closer together. Solid particles are tightly packed, and are structurally rigid. The following figure describes the different types of phase changes:
A heating or a cooling curve shows the change in temperature of a sample as it is heated or cooled. Sloped regions correspond to temperature changes in one of the different states. Flat regions (constant temperature) correspond to phase changes.
In this experiment we put the temperature probe in a kettle and see that while heating, the temperature stops rising at 100 Celsius degrees.
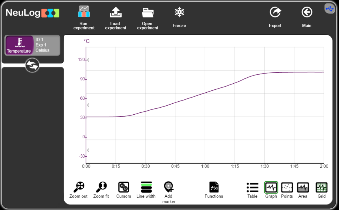
The reason for that is latent heat. Latent heat is the amount of energy absorbed or released by a substance during a change in its physical state (solid, liquid, gas) without a change in temperature.
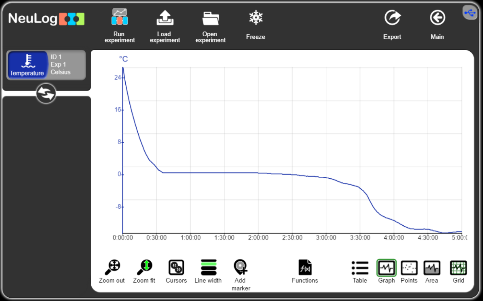
In order to check the freezing state, we put the probe in a bottle with water and put the bottle in a freezer for 5 hours or more.
We can see that the temperature goes down and stays constant at 0 degrees Celsius. The temperature continues to go down when all the water has turned into ice.
In this experiment we check also how salt affects the boiling and the freezing temperature points and to understand why we pour salt on icy roads.
The latent heat experiment is the fundamental for understanding distillation.
The lesson plan Distillation experiment, can be found in Physics experiment page in this site. This is an advanced experiment and requires a special kit for it.
Distillation is a purification method for liquids and separating liquid mixtures. It separates components of a mixture based on their boiling points (the temperature in which liquid changes into gas). It’s widely used both in laboratories and industrially, such as for refining crude oil or concentrating alcohol.
The general principle of distillation is starting with a mixture of liquids with different boiling points, heating the mixture to the first boiling point, cool down the vapor and collect the condensed liquid. This liquid is enriched with the lower boiling point component. The liquid that is left behind is enriched with the higher boiling point component.
In this experiment, we use a distillation kit to observe the distillation process by separating ethanol and food coloring from a solution.
Neuron Logger Sensors
14/05/2025
Sensors play a major role in science laboratories when conducting experiments in physics, chemistry, biology, and environmental sciences.
The NeuLog Logger-sensor is a unique answer to compatibility with all computer platforms.
NeuLog sensors are logger-sensors.
Each sensor has a brain of a tiny computer that samples, processes and stores data.
The sensors may be plugged into one another to create a chain of sensors according to the required experiment.
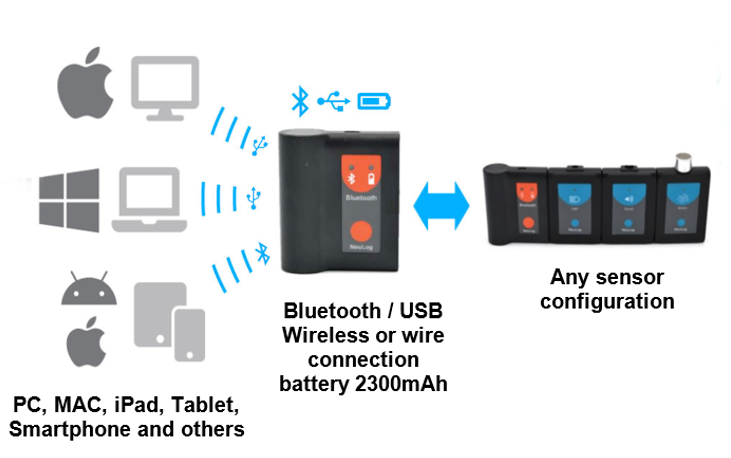
A chain of logger-sensors needs only one Bluetooth/USB module in order to connect to any computer platform, either by wire (USB) or wirelessly (Bluetooth), using a single communication channel.
Logger-sensors received the experiment setup (duration, sampling rate, trigger) from the computer platform and then work independently. Although they work independently, for best sampling rate, the samples of the chain of sensors are synchronized.
The logger-sensors supply processed data (oC, oF, Lux, dB, pH, etc.) to the receiving device and also store it in their flash memory.
A chain of logger-sensors needs only one battery module. 30 days of outdoor experiment data can be saved by a chain of logger-sensors.
Each logger-sensor can save up to 5 experiments in its flash memory. These experiments can be transferred to a computer at any time afterwards.
The Bluetooth/USB module has a built-in, very large capacity, rechargeable battery and it can also be used as a battery module for outdoor experiments.
Batteries and/or Bluetooth/USB modules are required for one lab according to the number of work stations it contains and not according to the number of sensors.
NeuLog Logger-sensors use one plug and play, simple to use, and multi-function software for all computer platforms.
Seamless Simplicity:
Built with You in Mind
NeuLog strips away complexity so you can dive straight into your experiments without a hitch. Here’s how we ensure that using NeuLog feels effortless:
- Instant Recognition, No Setup: Plug in your sensors, and NeuLog immediately identifies them. No calibration, any configuration—just connect and go.
- Universal Compatibility: Whether you’re using a PC, Mac, Linux system, iPad, tablet, or smartphone, NeuLog’s single software platform works seamlessly across most devices.
- Less to Manage: NeuLog keeps things simple and efficient. With a single Bluetooth/USB module, you can connect any combination of sensors to any computer platform.
With NeuLog, you spend less time troubleshooting and more time doing what you love: engaging with your students.
The Power of NeuLog:
Powerful Insights, Limitless Potential
While NeuLog is simple to use, it doesn’t compromise on robust capabilities. From data collection to in-depth analysis, NeuLog empowers users with professional-grade features:
- On-the-Go Memory: Each sensor is equipped with built-in flash memory for outdoor experiments.
- Effortless Connectivity: NeuLog simplifies communication through a single Bluetooth/USB module, ensuring that your focus stays on the experiment—not on troubleshooting connections.
- Data, Your Way: Visualize experiment results in the format that works best for you—Graph, Table, Dots, Area, or Grid views. It’s all about seeing the story behind the data.
- Advanced Built-in Analysis: Perform advanced mathematical manipulations and analysis directly within the software. There’s no need to rely on external tools to extract meaningful conclusions.
By balancing simplicity with sophisticated tools, NeuLog is your partner in creating a seamless journey from observation to discovery.
NeuLog Recommended Sets:
Tailored Solution for Every Experiment
Whether you’re working in a classroom, a laboratory, or out in the field, NeuLog sets are curated to ensure you have everything you need to start exploring right away.
Recommended Sets by Subject:
- Physics: Mechanics, electricity, sound, light, heat, and more.
- Biology: Human body, photosynthesis, ecosystems, and other life science studies.
- Chemistry: Producing electricity, ions in solution, acid rain, titration, distillation, and more.
- Environment: Sea water properties, air pressure and altitude, dew point, Raleigh scattering, GPS, temperature, humidity, and more.
Recommended Sets by School Level:
- Elementary: Simplified sets for introductory experiments that spark curiosity.
- High School: Advanced sets for deeper exploration of scientific concepts.
- Higher Education and Research: Comprehensive sets designed for complex, multi-variable experiments.
Why Choose a NeuLog Set?
- Curated for Simplicity: Each set includes all the essential sensors and tools to get started quickly, without worrying about compatibility or missing components.
- Versatility for Any Project: From basic science experiments to advanced research, there’s a set designed to fit your goals.
- Mix and Match – Your Experiment, Your Way: NeuLog sensors are sold individually or as part of a set, so you can select exactly what you need—no more, no less.
- Future-Ready: As your needs evolve, NeuLog sets are modular and expandable, allowing you to add new sensors without replacing your entire setup.
Coding For Young Students – The Next Big thing
5/9/2017
Why should we teach coding at a young age?
Around the world, students from elementary school and up are increasingly acquiring basic coding skills. Governments, educators and tech industry advocates argue that a basic understanding of coding and how electronic devices actually work is crucial nowadays. This is important for the students’ future career but also to their countries economy and tech industry.
Coding can seem intimidating or boring but if taught at a young age these assumptions can be disparaged and students can realize how creative this field is. Coding help develop problem solving skills, logical thinking, persistence, collaboration, communication and is a real empowering activity.
The earlier we introduce children to coding, the more comfortable they will be when coding will be introduced later down the line at a higher level.
What does leading people in the industry say?
|
Bill Gates Chairman, Microsoft Learning to write programs stretches your mind, and helps you think better, creates a way of thinking about things that I think is helpful in all domains. |
Mark Zuckerberg Founder, Facebook Our policy at Facebook is literally to hire as many talented engineers as we can find. There just aren’t enough people who are trained and have these skills today. |
|
will.i.am Musician/The Black Eyed Peas and Entrepreneur Here we are, 2013, we ALL depend on technology to communicate, to bank, and none of us know how to read and write code. It’s important for these kids, right now, starting at 8 years old, to read and write code. |
Richard Branson Founder, Virgin Group Whether we’re fighting climate change or going to space, everything is moved forward by computers, and we don’t have enough people who can code. Teaching young people to code early on can help build skills and confidence and energize the classroom with learning-by-doing opportunities. I learned how to fly a hot air balloon when I was 30,000 feet up and my life was in the balance: you can learn skills at any age but why wait when we can teach everyone to code now! |


Why teach coding with a robot?
A robot is a mechanical device that can be programmed to follow a set of instructions. A robot includes a processing unit, sensors to perceive its environment, and motors and actuators to move its limbs or wheels. So, why teach coding with a robot? It makes coding even more fun! It makes coding less abstract, you actually see the result of what you coded in the real world. On the way, students learn some science, engineering and math.
Robots are already part of everyday life, but over the coming decades we will see them more and more, therefore the robotics field will continue to grow and increase in job prospects.
Why teach coding with Sense?
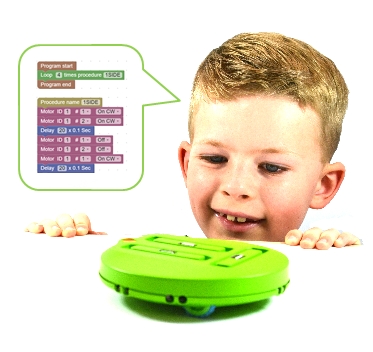
Sense is a robotic and computer programming system which allows users to explore, problem solve, and advance their computer programming abilities from just starting in visual block programming, to Python and C languages.
The sense platform can be expanded by over 45 different NeuLog sensors so that you can create solutions and codes the world has never thought of for any problem you try to overcome.
Students can program the Sense via the “RoblocklySense” programming platform which runs through your browser. It is very friendly and it is easy to create and run robotics programs.
Most Beautiful Graphs in Physics
9/6/2016
Every scientist knows that a nice looking figure can be very efficient in getting your paper published. A lot of NeuLog experiments generate really esthetic and interesting graphs. I gathered the top seven graphs for physics:
1. Simple Pendulum
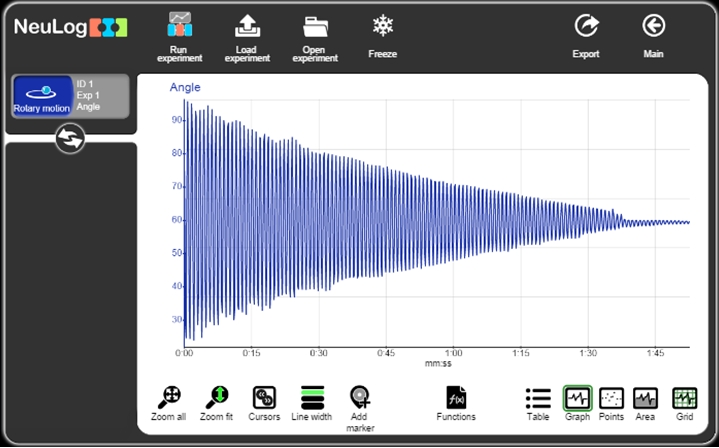
The location of a mass swinging back and forth on a thread was measured by a rotary motion sensor. Friction causes it to have slightly smaller amplitude each swing until decay.
2. Sound Waves
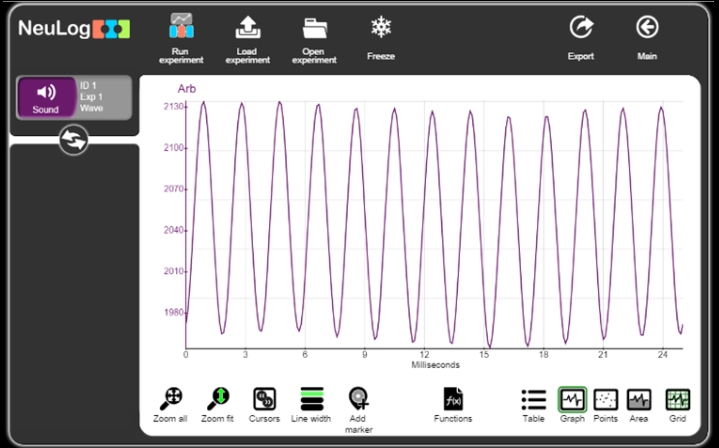
When hit by a hammer, the tines of a tuning fork vibrate back and forth pushing the air molecules around them. When the tine moves forward the molecules are pushed together creating a compression and when the tine moves backward it creates a rarefaction (low pressure region). The compressions and rarefactions were detected by a sound sensor. This created a nice recurring pattern.
3. Sound Beats
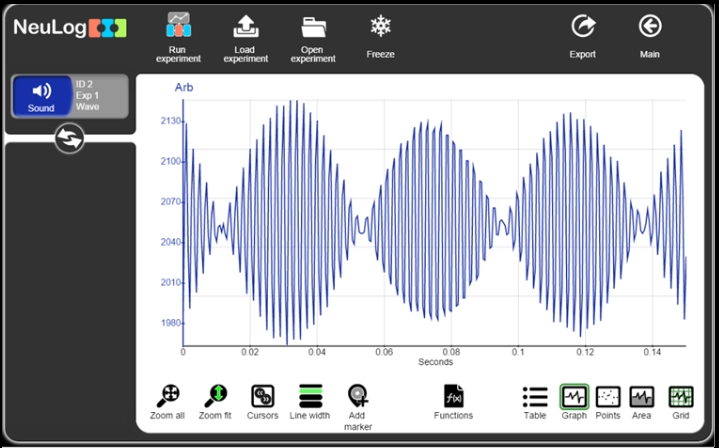
In this experiment, two tuning forks with different frequencies were hit to create a stunning graph that demonstrated wave interference. Wave interference is a phenomenon which occurs when two waves meet while traveling along the same medium. When two waves interfere, the resulting displacement of the medium at any location is the algebraic sum of the displacements of the individual waves at that same location.
4. Thermal Conductivity
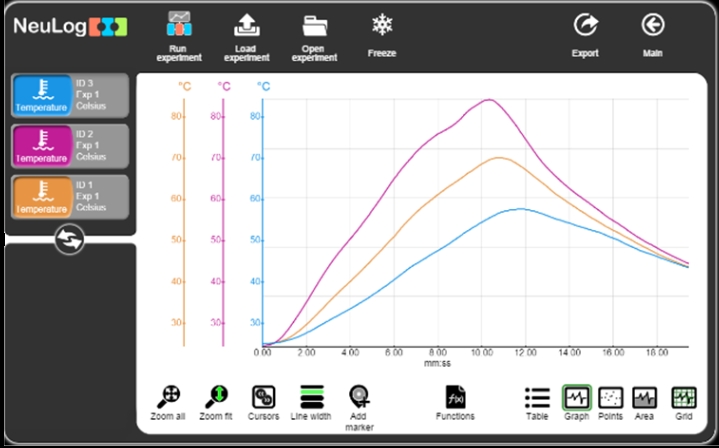
In this experiment, three different metals were heated and then cooled down. Their temperature was measured with the NeuLog Temperature sensor. The composition of the atoms in the material affects how the temperature changes.
5. Impulse and Momentum
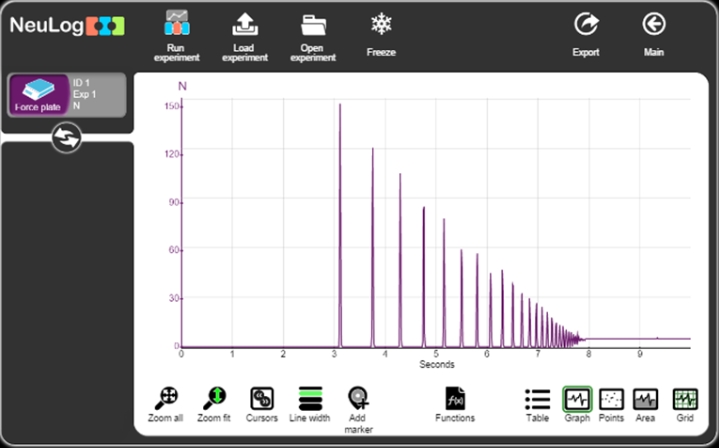
In this experiment, a basketball was dropped on a force plate sensor. The graph shows the force that was applied on it. Impulse and change in momentum values were calculated using this great graph. The interesting thing about this experiment is that not only did the ball height decrease over time, but there was also less time between each bounce.
6. Magnetic Field
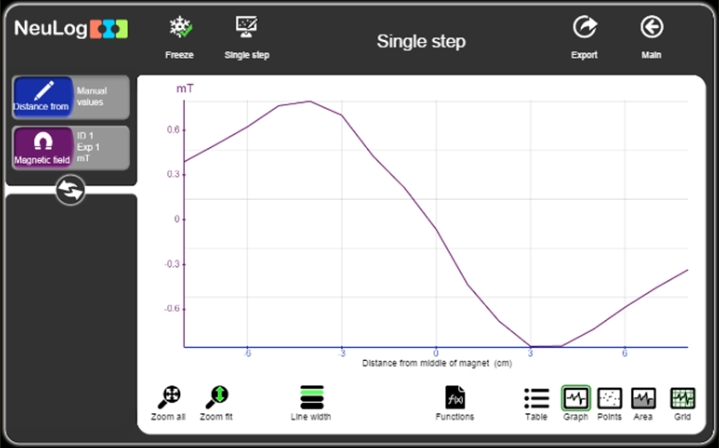
In this experiment, the magnetic field strength was measured at different locations on a bar magnet. This created a graph that has perfect rotational symmetry.
7. Charging a Capacitor

In this experiment, voltage and current were measured while a capacitor was charged and discharged. The current graph also has excellent rotational symmetry.
More to read – NeuBlog
- Projects using NeuLog sensors and AI
- Basic Sound Set and Sound experiments
- Basic Motion Set and Motion experiments
- Basic pH Set and pH experiments
- Published Research with NeuLog GSR sensor
- Basic GSR Set and GSR experiments
- Basic Heat Set and Heat experiments
- Neuron Logger Sensors
- Coding For Young Students – The Next Big thing
- Most Beautiful Graphs in Physics
- Light sensor brought to light